Control Engineering
Control Systems and Introduction to the EPICS Toolkit
Accelerator Control System: connects the Operator in the control room with the accelerator hardware. The control room might not be near the accelerator.
For example: SESAME has a Booster Ring, Storage Ring, 5 Beamlines, hundreds of Computers, magnets, vacuum pumps, a cooling system, RF system, power supply system, … etc. which all need to be closely and heavily controlled.

Experimental Physics and Industrial Control System (EPICS): is a collaboration software tool kit, that provides a control system architecture suitable for research and industrial facilities such as accelerators. EPICS uses a Client/Server and Publish/Subscribe methods and a Channel Access network protocol (3-tier architecture or 3 layer model).
EPICS is an open-sourced project assembeled by multiple collaborators in the accelerator industry, 12+ accelerators around the world have provided assistance in its development and still use it to this day.
Channel Access: A protocol to transfer data over network, a single data unit is called a Process Variable. The entire set of Process Variables establish a Distributed Real-time Database of machine statis, information and control parameters.
Channel Access Network Flow:
Query: broadcast and connection request.
Answer: direct connection
All further queries and answers work directly (Point-To-Point)

Main Access Commands in EPICS:
caget: returns the value of the PV or any sub-fields in the PV.caput: sets a value of a PV or a sub-field in a PV to a desired value and displays the old and newly assigned values.camonitor: sets up a monitor and continuously prints incoming changing values for PVs.cainfo: Prints all available channel status and information for a PV.
Packages that required for EPICS installation
GCC (GNU Compiler Collection): It is a set of tools and compilers for various programming languages that are mostly employed for linking and compiling C, C++, and Fortran programs.
GCC-C++:The C++ compiler is included in this package, which is an addition to GCC. If you wish to use GCC to compile and create C++ programs, it is necessary. For C++ development, the package includes the necessary libraries and headers.
# To install the GCC compiler, run the following commands:
sudo dnf clean all
sudo dnf update
sudo dnf group list
sudo dnf group install "Development Tools"
make :It is uitily that automates the porcess of building the application such as EPICS,Stream Device ,…etc. It reads the makefile and executes the commands in the makefile to build the application.
# To install the make the following command:
sudo yum install make
gcc-toolset-9-make: This package is a part of the GCC Toolset, which is a collection of development tools and libraries. It includes the “make” utility, which is used to manage and build software projects.
# To install the gcc-toolset-9-make from source the following command:
wget https://dl.rockylinux.org/pub/rocky/8/Devel/x86_64/os/Packages/g/gcc-toolset-9-make-devel-4.2.1-2.el8.x86_64.rpm

# To install the gcc-toolset-9-make from source the following command:
sudo yum install gcc-toolset-9-make-devel-4.2.1-2.el8.x86_64.rpm
readline-devel: The readline library is used for line editing during command-line input. It provides features like command history, editing capabilities, and tab completion.
# To install the GCC compiler, run the following command:
sudo yum install readline-devel
perl-ExtUtils-Install: Perl is a popular scripting language used for various purposes, including system administration and web development.
# To install the perl-ExtUtils-Install package, run the following command:
sudo yum install perl-ExtUtils-Install
EPICS Installation on Rocky Linux
To install EPICS on Rocky Linux, follow these steps:
# To install epics from source the following command:
wget https://epics-controls.org/download/base/base-3.15.6.tar.gz
# Then extract the file
tar -xvf base-3.15.6.tar.gz
# Then go to the extracted directory
cd base-3.15.6
# Then run the following command
make
# Then run the following command
make install
You have to add the following to the .bashrc file which where you can store your environment variables.
# To open the .bashrc file
  vim ~/.bashrc
  # Then add the following lines to the file
  export EPICS_BASE=${HOME}/base-3.15.6
  export EPICS_HOST_ARCH=$(${EPICS_BASE}/startup/EpicsHostArch)
  export PATH=${EPICS_BASE}/bin/${EPICS_HOST_ARCH}:${PATH}
Then to check if the installation is successful, run the following command:
# Then add the following lines to the file
caget -h
# Then you should see the following output
No pv name specified. ('caget -h' for help.)
# Run the following command to check if the installation is successful
caget
# Then you should see the following output
No pv name specified. ('caget -h' for help.)
if so then the installation is successful.
EPICS IOC Creation
# To create a new IOC
mkdir testIOC
cd testIOC
makeBaseApp.pl -t ioc iocName
makeBaseApp.pl -i ioc iocName
vim configure/RELEASE
# Make sure EPICS base path and support modules are written in the right form
vim testIOC/testApp/Db/test.db
# Go to the Makefile in the Db directory
# Make sure that the area where there is "xxx.db" is filled in with the name of the db file you have created previously. "test.db" in this case.
Add the following lines to the test.db file
record(ai, “test:first_pv”) {
field(DESC,”test first record”) field(VAL, “40”)
}
# Now to Build the IOC do the following
cd
cd testIOC
make
make install
# After it has been built, to check whether if the build was successful, go to testIOC/db/test.db (this is an uneditable file, if it has the same content as the one you have created in the testApp/Db then the build was successful)

# Finally to activate the IOC, run the following command, (pay attention to switch the names of this IOC to the specific one you have created)
./bin/linux-x86_64/iocName iocBoot/iocName/st.cmd
Only the following lines should be in the Makefile file.
record(ai, “test:first_pv”) {
field(DESC,”test first record”) field(VAL, “40”)
}
cd
cd testIOC
vim Makefile
IOC Database
In the IOC database, there are units of PV’s called Records. Each of these records has a specific type that allows it to alter the functionality of the PV. In every one of these records, there are fields, in which include attributes and some of the possible functions that that the PV could do.
Record: an object with a unique name, properties (fields) and contains information (data) where different data types can appear in different fields. A record also has the ability to perform actions on data.
Naming a PV: a PV is comprised of two parts: - The record name - The name of a field belonging to that record
For example: ARIDI-PCT:CURRENT. in this case most record fields can be accessed individually.
Note: if no field name is given, Channel Access will by default use the .VAL field.
A general structure of what you might write in an IOC in terms of records and fields is the following:
record(ai, "test:Altitude_PV") {
  field(INP, "@user")
  field(VAL, 0.0)
}


record(ai, "test:Base_PV") {
  field(INP, "@user")
  field(VAL, 0.0)
}


record(calc, "test:Calc_PV") {
  field(DESC, "Calculation of side C (hypotenuse)")
  field(CALC, "SQR(A*A + B*B)")
  field(INPA, "test:Altitude_PV CP")
  field(INPB, "test:Base_PV CP")
}
The documentation for the list of records on EPICS and their respective fields can be found on this page: https://epics.anl.gov/EpicsDocumentation/AppDevManuals/RecordRef/Recordref-3.html
After creating your IOC database, in order to interact with it you would have to use a Channel Access (CA) Client.
Some of the most used CA clients are the following:
Command line tools(caget,caput,…)
ALH: Alarm Handler
StripTool: Strip-chart Plotting Tool
catQtDM: Display Manager
Small Exercise for bash scripting
Introduction
This script is a Bash script that interacts with EPICS (Experimental Physics and Industrial Control System) and logs the output to a file. The script contains functions to retrieve and set values for EPICS records and logs the operations to the “output.log” file.
Functions
1. log()
The
log()function appends a log message with the current date and time to the “output.log” file.Parameters: -
$1: The message to be logged.Usage:
log "Message to be logged"
2. get_record_value()
The
get_record_value()function retrieves the value of a specified EPICS record and logs it using thelog()function.Parameters: -
$1: The name of the EPICS record to retrieve the value for.Usage:
get_record_value "record_name"
3. set_record_value()
The
set_record_value()function sets a specified value for a given EPICS record and logs the operation using thelog()function.Parameters: -
$1: The name of the EPICS record to set the value for.
$2: The value to be set for the EPICS record.Usage:
set_record_value "record_name" "value"
Usage Example
Below is an example of how to use this script:
set_record_value "test:Base_PV" "3"

set_record_value "test:Altitude_PV" "4"
Conclusion
This script provides a simple way to interact with EPICS records and log the operations to a file.
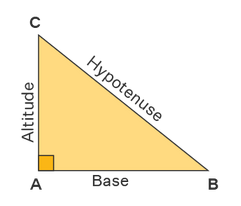
IOC Hypotenuse Project Exercise
After getting more familiar with the Database section, this is a small exercise that would help put your knowledge into practice.
Define a record that calculates the hypotenuse of a right triangle. The record should have two input fields, A and B, and one output field, VAL. The record should calculate the hypotenuse using the following formula:
- To test :in your terminal
caput <record_name>:A <value>
caput <record_name>:B <value>
caget <record_name>
record(ai, "test:Altitude_PV") {
  field(INP, "@user")
  field(VAL, 0.0)
}


record(ai, "test:Base_PV") {
  field(INP, "@user")
  field(VAL, 0.0)
}


record(calc, "test:Calc_PV") {
  field(DESC, "Calculation of side C (hypotenuse)")
  field(CALC, "SQR(A*A + B*B)")
  field(INPA, "test:Altitude_PV CP")
  field(INPB, "test:Base_PV CP")
}
caput test:Altitude_PV 3
caput test:Base_PV 4
caget test:Calc_PV
Then you should see the answer in the terminal
PV Triangle Plotter with Python
A Python script for manipulating Process Variables (PV) and plotting a triangle based on the given base and altitude values.
import sys
import argparse
import matplotlib
import matplotlib.pyplot as plt
import numpy as np

from epics import caget, caput, cainfo


def ca_put_info(pv, value):
    caput(pv, value)


def ca_get_info(pv):
    return caget(pv)

def draw_triangle(base, altitude):
    vertices = [(0, 0), (base, 0), (0, altitude), (0, 0)]

    x = [vertex[0] for vertex in vertices]
    y = [vertex[1] for vertex in vertices]

    plt.figure()
    plt.plot(x[:2], y[:2], '-o', color='red')
    plt.plot(x[1:3], y[1:3], '-o', color='green')
    plt.plot(x[2:], y[2:], '-o', color='blue')

    cmap = matplotlib.cm.get_cmap('cool')

    plt.fill_between(x[:2], y[:2], color=cmap(0.3), alpha=0.3)
    plt.fill_between(x[1:3], y[1:3], color=cmap(0.5), alpha=0.3)
    plt.fill_between(x[2:], y[2:], color=cmap(0.7), alpha=0.3)

    plt.text((x[0] + x[1]) / 2, (y[0] + y[1]) / 2, 'base', ha='center', va='bottom', color='red')
    plt.text((x[1] + x[2]) / 2, (y[1] + y[2]) / 2, 'hypo', ha='center', va='bottom', color='green')
    plt.text((x[0] + x[2]) / 2, (y[0] + y[2]) / 2, 'altitdue', ha='right', va='top', color='blue')


    plt.xlabel('X')
    plt.ylabel('Y')
    plt.title('Triangle')
    plt.grid(True)
    plt.savefig('triangle_plot.png')

def main(args):
    if len(args) != 2:
        print('Only 2 numbers are allowed')
        sys.exit(1)
    else:
        print('Args:', args)
        print(caget('test:Base_PV'))
        ca_put_info('test:Base_PV', args[0])
        ca_put_info('test:Altitude_PV', args[1])
        print(ca_get_info('test:Calc_PV'), 'is the calculated value')

        base = args[0]
        altitude = args[1]
        draw_triangle(base, altitude)


if __name__ == '__main__':
    parser = argparse.ArgumentParser(
        description='Process two numbers for PV manipulation')
    parser.add_argument('number1', type=int, help='Base number')
    parser.add_argument('number2', type=int, help='Altitude number')

    args = parser.parse_args()
    numbers = [args.number1, args.number2]
    main(numbers)
Usage
The script requires two command-line arguments: number1 and number2. These arguments represent the base and altitude values respectively.
$ python pv_triangle_plotter.py number1 number2
Arguments
- number1
- number2
Base and altitude numbers used to calculate the area and draw a triangle.
Both arguments should be integers.
Functionality
Process Variable Manipulation:
The script uses the epics library to interact with Process Variables (PVs) using the Channel Access (CA) protocol. The following functions are used for PV manipulation:
ca_put_info(pv, value): Writes a value to the specified PV.ca_get_info(pv): Reads the value from the specified PV.
Triangle Plotting:
The script includes a function named
draw_triangle(base, altitude)that plots a triangle based on the given base and altitude values. The triangle is plotted using matplotlib.The function performs the following steps:
Defines the vertices of the triangle based on the given base and altitude.
which will get take x and y vertices
Plots the sides of the triangle using different colors.
Fills the triangle with a gradient color.
Adds labels to each side of the triangle.
Sets the axis labels, title, and grid for the plot.
Saves the plot as a PNG file.
Example
To calculate the area and plot a triangle with a base of 5 and an altitude of 8, run the following command:
$ python pv_triangle_plotter.py 5 8
This will write the base and altitude values to the corresponding PVs, calculate the area using a separate PV, and save the triangle plot as triangle_plot.png.

EPICS-Qt Installation and Configuration
This documentation provides step-by-step instructions to install and configure EPICS-Qt, a framework that integrates Experimental Physics and Industrial Control System (EPICS) with Qt, allowing the development of user interfaces for EPICS-based control systems.
1. Installing Qt Creator using DNF
To install Qt Creator from the repository using DNF (Dandified Yum), follow these steps:
Open a terminal.
Execute the following command to install Qt Creator and related packages:
$ dnf install qt5*
2. Building EPICS-Qt from Source
To build EPICS-Qt from the source, you will need the epics-qt-source.tar.gz archive. Follow these steps to build EPICS-Qt:
Extract the epics-qt-source.tar.gz archive to a desired location on your system.
Open a terminal and navigate to the extracted epics-qt-source directory.
Execute the following commands to build and install EPICS-Qt:
$ make
$ make install
The EPICS-Qt libraries and components will be built and installed on your system.
3. Configuring Environment Variables
To configure the necessary environment variables for EPICS-Qt, add the following lines to your .bashrc file. Ensure you replace <<<<EPICS_BASE_LOCATION>>>> with the actual path to your EPICS base installation and verify the specific versions installed on your system:
export EPICS_BASE=/path/to/your/epics/base

export EPICS_HOST_ARCH=linux-x86_64

export QWT_ROOT=/usr/local/qwt-6.1.3

export QWT_INCLUDE_PATH=${QWT_ROOT}/include

export QE_TARGET_DIR=/usr/local/epics-qt

export PATH=${EPICS_BASE}/bin/${EPICS_HOST_ARCH}:${QE_TARGET_DIR}/bin/${EPICS_HOST_ARCH}:/usr/lib64/qt5/bin:${PATH}
export LD_LIBRARY_PATH=${EPICS_BASE}/lib/${EPICS_HOST_ARCH}:/usr/local/qwt-6.1.3/lib:${QE_TARGET_DIR}/lib/${EPICS_HOST_ARCH}:${QE_TARGET_DIR}/lib/${EPICS_HOST_ARCH}/designer

export QT_PLUGIN_PATH=${QT_PLUGIN_PATH}:${QWT_ROOT}/plugins:$QE_TARGET_DIR/lib/${EPICS_HOST_ARCH}
4. Conclusion
You have successfully installed and configured EPICS-Qt on your system. With this setup, you can now develop user interfaces for EPICS-based control systems using Qt Creator and the EPICS-Qt framework.
Add this to the .pro file
unix:!macx: LIBS += -L$$(QE_TARGET_DIR)/lib/linux-x86_64/ -lQEFramework

unix:!macx: LIBS += -L$$(QE_TARGET_DIR)/lib/linux-x86_64/designer -lQEPlugin

INCLUDEPATH += $$(QE_TARGET_DIR)/include

DEPENDPATH  += $$(QE_TARGET_DIR)/include

unix:!macx: LIBS += -L$$(QWT_ROOT)/lib/ -lqwt

INCLUDEPATH += $$(QWT_ROOT)/include

DEPENDPATH  += $$(QWT_ROOT)/include

unix:!macx: LIBS += -L$$(EPICS_BASE)/lib/linux-x86_64/ -lca

unix:!macx: LIBS += -L$$(EPICS_BASE)/lib/linux-x86_64/ -lCom

INCLUDEPATH += $$(EPICS_BASE)/include

DEPENDPATH += $$(EPICS_BASE)/include

INCLUDEPATH += $$(EPICS_BASE)/include/os/Linux

DEPENDPATH += $$(EPICS_BASE)/include/os/Linux

INCLUDEPATH += $$(EPICS_BASE)/include/compiler/gcc/
Python Server script for handling commands with epics PVs
This script implements a server that handles commands received from clients over a TCP/IP connection.
import socket
import subprocess
import threading
import re
from functools import reduce

def store_failed_command(command):
    with open('failed_command.txt', 'a') as file:
        file.write(command + '\n')

def get_current_time():
    current_time = subprocess.check_output('date', shell=True).decode().strip()
    format_time = re.search(r'(\d{2}:\d{2}:\d{2})', current_time)
    return format_time.group(1)

def calculate_circle_area(radius):
    area = 3.14159 * radius * radius
    return area


def calculate_multiplication(numbers):
    result = reduce(lambda x, y: x * y, numbers)
    return result


def get_ip_address():
    # Logic to get IP address
    hostname = socket.gethostname()
    ip_address = socket.gethostbyname(hostname)
    return ip_address


def handle_command(command):
    if command.startswith('print '):
        message = command[6:]  # Extract the message to be printed
        print(message)
        return f"'{message}' from the Server."
    elif command == 'time?':
        return get_current_time()
    elif command.startswith('area'):
        match = re.search(r'area pi,(\d+(\.\d+)?)', command)
        if match:
            radius = float(match.group(1))
            return calculate_circle_area(radius)
    elif command.startswith('multi'):
        match = re.search(r'multi ([\d,]+)', command)
        if match:
            numbers = list(map(int, match.group(1).split(',')))
            return calculate_multiplication(numbers)
    elif command == 'ip?':
        return get_ip_address()
    elif command.startswith('smax'):
        match = re.search(r'smax ([\d,]+)', command)
        if match:
            numbers = list(map(int, match.group(1).split(',')))
            return calculate_smax(numbers)

    return f"Invalid command. {store_failed_command(command)} is not recognized"


def calculate_smax(numbers):
    max_product = reduce(lambda x, y: max(x, x * y), numbers)
    return max_product


class Server:
    def __init__(self, host, port):
        self.host = host
        self.port = port

    def start(self):
        self.server_socket = socket.socket(socket.AF_INET, socket.SOCK_STREAM)
        self.server_socket.bind((self.host, self.port))
        self.server_socket.listen(1)
        print(f"Server listening on {self.host}:{self.port}")

        while True:
            client_socket, client_address = self.server_socket.accept()
            print(
                f"Accepted connection from {client_address[0]}:{client_address[1]}")
            client_thread = threading.Thread(
                target=self.handle_client, args=(client_socket,))
            client_thread.start()

    def handle_client(self, client_socket):
        while True:
            data = client_socket.recv(1024).decode().strip()
            if not data:
                break
            response = handle_command(data)
            client_socket.sendall(str(response).encode())

        client_socket.close()


if __name__ == '__main__':
    host = 'localhost'
    port = 8000

    # Start the server
    server = Server(host, port)
    server_thread = threading.Thread(target=server.start)
    server_thread.start()

    while True:
        command = input("Enter a command: ")
        if command.lower() == 'exit':
            break

        response = handle_command(command)
        print(response)
Usage
To start the server, run the script with the desired host and port:C
if __name__ == '__main__':
    host = 'localhost'
    port = 8000
    server = Server(host, port)
    server_thread = threading.Thread(target=server.start)
    server_thread.start()
The server will listen for incoming connections on the specified host and port.
Commands
The server recognizes the following commands:
Print Message Syntax:
print <message>Description: Prints the specified message.Get Current Time Syntax:
time?Description: Returns the current time.Calculate Circle Area Syntax:
area pi,<radius>Description: Calculates the area of a circle with the given radius.Calculate Multiplication Syntax:
multi <number1,number2,...>Description: Calculates the multiplication of the specified numbers.Get IP Address Syntax:
ip?Description: Returns the IP address of the server.Calculate Smax Syntax:
smax <number1,number2,...>Description: Calculates the maximum product of the specified numbers.
Failed Command Storage
If an invalid command is received, it is stored in a file called failed_command.txt for reference.
Example
An example usage of the script:
Start the server by running the script with the desired host and port.
Connect a client to the server using a TCP/IP connection.
Send commands to the server and receive the corresponding responses.
Comuniacte EPICS IOC with Python Server
The protocol file is used to commmuiacte EPICS IOC with Python Server and how it works.
Protocol File Content
The following changes were made to the protocol file:
- Timeout Configuration
@writetimeout { disconnect; }@replytimeout { disconnect; }@readtimeout { disconnect; }
- Terminator Definitions
InTerminator = "\r\n";OutTerminator = "\r";
- Replay Timeout
ReplayTimeout = 11200000000;
- Command Definitions
getTime: get the current time.getIP: get the ip address of the server.calcarea: Calculates the area of a circle.smax: Calculates the maximum product of 3 numbers.multi: Calculates the multiplication of 3 numbers.
getTime {
  out "time?";
  in "%d:%d:%d";

}

getIP {
  out "ip?";
  in "%s";}

calcarea {
  out "area pi,%f";
  in "%f";
  }

smax {
out "smax %(\$1)d,%(\$2)d,%(\$3)d" ;
in "%d";
}

multi {
out "multi %(\$1)d,%(\$2)d,%(\$3)d" ;
in "%d";
}
Record Changes
record(ai, "PyServer:Time") {
  field(DTYP, "stream")
  field(INP, "@python.proto getTime PyServer")
  field(SCAN, "1 second")
}


record(stringin, "PyServer:IP") {
  field(DTYP, "stream")
  field(INP, "@python.proto getIP PyServer")
  field(SCAN, "1 second")
}


record(ao, "PyServer:CalcAreaInput") {
  field(DTYP, "stream")
  field(OUT, "@python.proto calcarea PyServer")
}

record(ai, "PyServer:CalcAreaResult") {
  field(DTYP, "stream")
  field(INP, "@python.proto calcarea PyServer")
}

record(ai, "PyServer:smax") {
field(DTYP, "stream")
field(INP, "@python.proto smax(X,Y,Z) PyServer")
field(SCAN, "1 second")
}

record(ai, "PyServer:multi") {
field(DTYP, "stream")
field(INP, "@python.proto multi(A,B,C) PyServer")
field(SCAN, "1 second")
}

record(ai, "X") {
    field(INP, "@user")
    field(VAL, 4)
}
record(ai, "Y") {
    field(INP, "@user")
    field(VAL, 1)
}
record(ai, "Z") {
    field(INP, "@user")
    field(VAL, 15)
}
record(ai, "A") {
    field(INP, "@user")
    field(VAL, 24)
}
record(ai, "B") {
    field(INP, "@user")
    field(VAL, 21)
}
record(ai, "C") {
    field(INP, "@user")
    field(VAL, 25)
  }
The record definitions in the PV configuration file were modified to use the Python server protocol for communication.
The following changes were made to the record definitions:
PyServer:Time (ai) - The input field (INP) was updated to use the getTime command from the PyServer protocol.
PyServer:IP (stringin) - The input field (INP) was updated to use the getIP command from the PyServer protocol.
PyServer:CalcAreaInput (ao) - The output field (OUT) was updated to use the calcarea command from the PyServer protocol.
PyServer:CalcAreaResult (ai) - The input field (INP) was updated to use the calcarea command from the PyServer protocol.
PyServer:smax (ai) - The input field (INP) was updated to use the smax command from the PyServer protocol.
PyServer:multi (ai) - The input field (INP) was updated to use the multi command from the PyServer protocol.
X, Y, Z, A, B, C (ai) - These user-defined records were added to provide input values for the PyServer protocol commands.
st.cmd Changes
The st.cmd script was modified to include the necessary configurations for the Python server protocol.
The following changes were made to the st.cmd script:
STREAM_PROTOCOL_PATH - The environment variable “STREAM_PROTOCOL_PATH” was set to “path/to/protcol file”.
drvAsynIPPortConfigure - The drvAsynIPPortConfigure function was called to configure the “PyServer” port with the following parameters:
Port name: “PyServer”
Address: “localhost:8000”
No auto-connect, no auto-disconnect, and no process variable updates were specified (0, 0, 0).
Makefile Changes
The makefile in the src directory was modified to include the required dependencies for the Python server protocol.
The following changes were made to the makefile:
test_DBD - The following additional database (DBD) files were included as dependencies:
asyn.dbd
drvAsynIPPort.dbd
calc.dbd
stream.dbd
test_LIBS - The following additional libraries were included as dependencies:
asyn
stream
calc
EPICS GUI with Qt for the Python Server

As yo can see the GUI is composed of 6 things
A box to get the current time
A box to get the IP address
A box to calculate the area of a circle
A box to calculate the smax of three numbers
A box to calculate the multiplication of three numbers
A box to calculate right triangle hypotenuse
EPICS IOC Creation and Running (SIEMENS PLC)
PLCs are specialized digital computers used in industrial automation and control systems for automating and regulating electromechanical processes, benefiting various industries like manufacturing, automotive, and power generation.
Reliability: They can be used for a long time without any problems
Modularity: PLC systems are modular, allowing easy expansion and customization based on the complexity of the control task.
Remote Monitoring and Control: PLCs enable remote monitoring and control of industrial processes.
Real-time Performance: PLCs provide real-time performance, allowing for faster response times and higher throughput rates.
Ladder logic programming is a widely used programming language for PLCs, mimicking electrical relay ladder diagrams. It enables engineers and electricians to design logic-based control algorithms.
As stated before EPICS is great software for controlling and mootiering. The use it of allow facilites to have a single system that control and monitor all the devices in the facility.
S7nodave is a popular open-source driver used for communication with Siemens S7 PLCs for epics. which will be used in this tutorial.
To install S7nodave, follow these steps:
Download the S7nodave driver from the official website or repository.
Extract the downloaded files to a directory on your computer.
To configure S7nodave for communication with Siemens PLC, follow these steps:
Initialize the communication with the PLC:
s7nodaveConfigureIsoTcpPort("S7PLC", "192.168.0.1", 0, 2, 0)
. Define input and output records in EPICS database (db) files
record(ai, "plc:red") {
    field(DTYP, "s7nodave")
    field(INP, "@PLC MD1.1 float")
    field(SCAN, "0.1 second")
}

record(ai, "plc:white") {
    field(DTYP, "s7nodave")
    field(INP, "@PLC MD1.2 float")
    field(SCAN, "0.1 second")
}

record(ai, "alc:green") {
    field(DTYP, "s7nodave")
    field(INP, "@PLC MD118 int16")
    field(SCAN, "0.1 second")
}

record(bi, "plc:button") {
    field(DTYP, "s7nodave")
    field(INP , "@PLC MD121 ")
    field(SCAN, "0.1 second")
    field(ZNAM, "OFF")
    field(ONAM, "ON")
}

record(bo, "plc:led") {
    field(DTYP, "s7nodave")
    field(OUT, "@PLC MD2.3 ")
    field(ZNAM, "OFF")
    field(ONAM, "ON")
}
In the above configuration, we define several EPICS records for different data types that communicate with the Siemens PLC using the S7nodave driver.
DTYP: Tell EPICS which driver to use for the recordINP: Tell EPICS where to read data fromOUT: Tell EPICS where to write data toSCAN: Define the scan rate of the recoredZNAMandONAM: Define what is zero and one for the record
By configuring these EPICS records with the appropriate memory addresses and data types, we can read and write data from/to the Siemens PLC using the S7nodave driver.
EPICS GUI with Qt for the PLC

The UI have the following buttons:
Buttons to turn on/off the LED
Button to see the button pressed or not
The reading of different sensors in the PLC